THE PAINT SHOP
The Best 1968 Shelby Exterior Color Chart
| Ford Color Name |
Ford Warranty Code |
Ford Color Code |
Ditzler/PPG Code |
DuPont Code |
R-M Code |
| Red |
T |
2008 |
71528 |
4737 | 1782 |
| Acapulco Blue Metallic |
D |
3077 |
13357 |
4857 | 1935 |
| Dark Green Metallic |
R |
3067 |
43644 |
4869 | 1946 |
| Lime Green Metallic |
I |
2041 |
43576 |
4790 | 1882 |
| White |
M |
1619 |
8378 |
4480 | 1633 |
| Gold Metallic |
Y |
3073 |
22833 |
4874 | 1951 |
| Black |
A |
1724 |
9000 |
88 | 946 |
| Not assigned |
None |
WT 6066 |
81639 |
24934 | 7563 |
| Maroon |
B |
3059 |
50746 |
4864 | 1630 |
| Not assigned |
None |
WT 5185 |
60524 |
97249H | 7554 |
| Not assigned |
None |
WT 5107 |
60334 |
6753D | 7548 |
| Not assigned |
None |
WT 5014 |
60513 |
92022 | 7540 |
| Not assigned |
None |
WT 4017 |
71649 |
066H | 5915 |
| Not assigned |
None |
WT 7081 |
43822 |
1317 | 3283 |
| Brittany Blue |
Q |
1624 |
13619 |
1624 | 1643 |
| Meadowlark Yellow |
W |
3120 |
81584 |
3120 | 1949 |
Revised 1/11/23
The above chart shows all the 1968
Shelby colors. The most common colors are at the top of the chart.
There were a total of 159
special paint cars. These cars are denoted by their special paint codes (WT number).
It is believed only 15
cars were colors other than yellow. Please take a look at the special paint page for
more information. The color Gold was dropped by AO Smith and replaced by the
paint code WT6066, special yellow. Only a handful of Maroon cars were built.
This information is for a New Jersey built 1968 Mustang unibody (Shelby).
Please keep in mind, each car was different and other model years may be
significantly different. Ford originally used a single stage enamel paint for the Mustangs. AO Smith was supposed to use enamel, but used both enamel and laquer in the preperation of some fiberglass parts.
I recommend you totally disassemble the vehicle. Take
everything off, that can come off. Have your body work done and paint the car
entire unibody red-oxide primer. In my personal research, I have noticed that
the original primer is a little browner than red-oxide. However, the red-oxide
is perfectly acceptable.
The Body
Inside the car try for 100%
coverage. The factory usually left primer under the rear seat.
I would
also shoot 100% in the trunk and the rear wheel wells. Before you paint the
trunk, you will need a little sound deadner on the backs of the inner quarter
panels. Some of the other sealers and deadners are applied after the body color
is on the car. The most notable location is the rear wheel wells. You might also checkout the Ford assembly manuals.
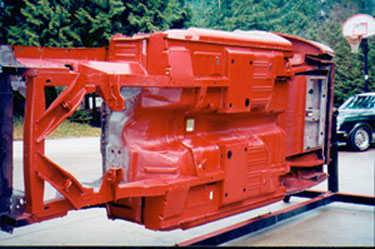
This photo shows a red oxide unibody ready for
body color.
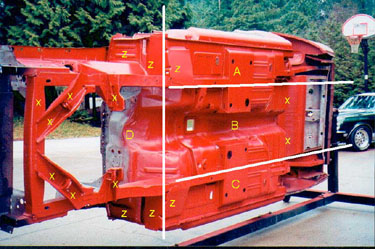
The photo above shows where the
body color will go on the undercarrige. Everything to the left of the vertical
line will be blacked out by engine compartment blackout paint. There are no clear
"cut" lines or sharp edges under the car. The blackout will fade into the body color as it
rolls under the body.
The area to the right of the vertical line is
divided into three zones. They are Zone A, Zone B, and Zone C.
Zone B is
the easiest. It will be almost entirely primer.
In Zones A and C, the
body color will be heaviest near the rocker panels (outside) and gradually fade
into the primer. Everycar was different, but these are good basic guidelines.
The area immediately above the rear axle will be almost all primer. The Big "D"
shows the area where the engine blackout fades out.
If you look at the
car when it is on all four wheels, the undercarrige will appear to have a lot of
body color overspray. If you were to look across the body to the opposite
rocker, you would see almost all primer. You are going to find primer in all the
areas marked with an "x". These nooks and crannies could not be reached by the
spray guns. The areas marked by a "z" could be a mixture of body color and
primer.
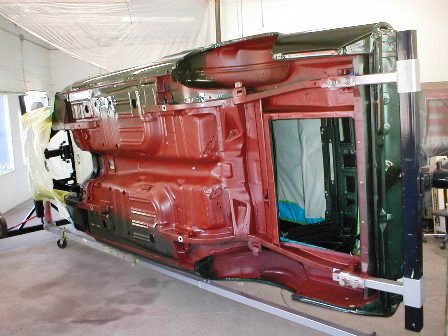
Here's some Highland Green on a GT500 KR
fastback. It looks great. Notice how the insides of the rails and bumps are almost
all primer, while the outsides are body color. You can see two round spots, in the center of the photo, on the frame rail extensions.

Pre-Paint spots
There are eight spots on the lower body that never received any paint (four per side). These unpainted spots are
usually referred to as "pre-paint" spots. They are, in fact, attachment points
for the dolly that held the car during painting.
Inside the trunk you will also see two bare spots on the trunk floors.
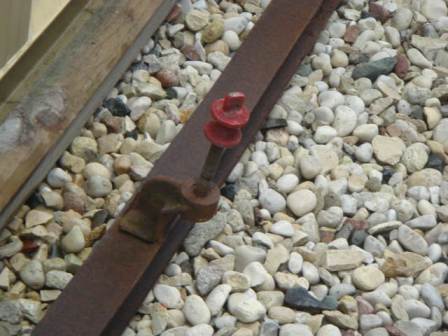
This is an actual assembly line dolly. The bare, unibody was mounted to this skid (one per side) during the painting process. The vertical mounting pedestals create the pre-paint spots. The red screw would have secured the car to the dolly. This created the bare spot on the trunk floor and inside the car (under the carpets). This dolly came from the Dearborn assembly plant. Thanks to Bob Perkins for these pictures.

This original assembly line quality card has seen better days. You can see the cars mounted on the dollies. Any defects in the paint would have been noted on this card and repaired before shipping.
Engine Compartment
The blackout for the engine
compartment is sprayed after the body color.

This drawing shows the area that the factory required to be blacked out. The idea is no body color or primer should show behind the wheel. There is a sharp masking line across the tops of the rear aprons. Most New Jersey production cars I have seen have nearly 100% blackout.
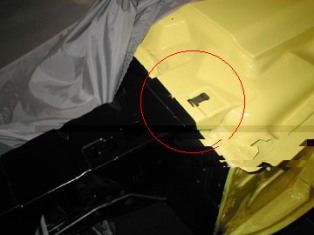
The photo on the left shows the small
tab located between the rear, inner fender apron and the cowl. I have found
that there is a clear, sharp edge to the overspray in this area. The line is
even with the cowl. The left fender is removed in the photo.
The photo on the right is an unrestored
low mileage original. You can see the black originally extended rearward around the screw. Because the area is overspray, even
a light cleaning can remove the blackout.
Other body Panels
The front fenders were painted seperately off the body. They started out in red oxide primer. The exterior surfaces will receive body color. Some over spray on the back sides is considered normal. The rear lower valence (steel) was loosely attached and is usually body color with a red oxide backside. Typically, several of the mounting screws are painted and some are are not.
Shelby fiberglass was originally a pinkish-white color. The exterior surfaces of the fiberglass parts were given a coat of gray primer. All finished surfaces received body color. The back sides of fiberglass are usually bare fiberglass. Some overspary on the back sides of the fiberglass is normal. Hard to reach areas will be bare fiberglass.
All surfaces of the hood and the rear decklid were body color.
The lower air scoops on most cars are blacked out on the insides.
This blackout is on the body and the inside of the scoop. If you have a
fastback, the inside of the front opening on the upper scoop is also blacked
out. The rear opening is left body color.
Under the
doors, below the rocker molding is a small lip. It is call the "pinch weld".
Ford blacked this out, to make it blend with the bottom of the car. If your
car is a dark color, it is not necessary to use the
blackout. Because it was sprayed there are no hard edges.
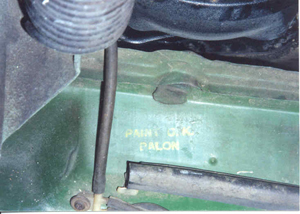
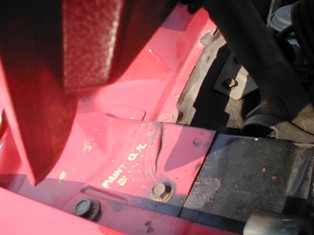
Once everything was sprayed,
it was inspected. You have probably seen these inspector stamps on show cars. I
have noticed most 1968 New Jersey cars are stamped three times. Usually, at
least two different inspectors. If you are lucky enough to find any of these
stampings, please drop me a note. The format is "PAINT O.K." followed by the
inspectors name. This is an original stamping. The picture is inverted so you
can see the stamping.
The Best 1968 Shelby Interior Color Chart
| Ford Color Name |
Ford Interior Code |
Ditzler/PPG Code |
DuPont Code |
| Black Charcoal Metallic |
5A / 6A |
32586 |
9354 |
| Medium Saddle |
6F |
22787 |
9359 |
| Dark Saddle |
6F |
22959 |
9358 |
Medium and Dark Saddle are used together
on fastbacks.
The color Argent was used on all tail light valences. It is
a silver metallic color. This Ford color was used for many years on a variety of
parts, including wheels. Argent is Ditzler/PPG # 32520. The Dupont number is
97772.
HOME